
Key Takeaways
- Checking your storage drive specifications (type, model, capacity) ensures your PC or laptop meets the minimum requirements for new software, games, or system upgrades.
- Both Windows and macOS have built-in utilities (System Information and About This Mac, respectively) that provide all the necessary details without installing third-party software.
- More advanced methods, like checking the BIOS/CMOS or physically removing the drive from the computer, offer the most comprehensive data but carry a greater risk for inexperienced users.
Understanding your storage drive is essential for computer maintenance and upgrades. Modern computers use two main types of storage: traditional hard disk drives (HDDs) with spinning platters, and solid-state drives (SSDs) that use flash memory. While technically different technologies, the term "hard drive" here is often used to refer to both. This guide will help you identify which type you have and find its detailed specifications, including model number, capacity, and performance characteristics.
Part I: Quick & easy methods to check hard drive type
The following methods are the easiest and lowest-risk, primarily focused on quickly identifying the Media Type (SSD or HDD), requiring only clicks, not commands, on Windows 11 and macOS.
- Best for: Casual users who need quick confirmation of drive type (SSD vs HDD) and basic specifications.
- Time required: 30 seconds to 2 minutes.
- Risk level: None.
Use Windows Task Manager (Windows 10/11)
Best for: Fastest method to check drive type and model name.
The Task Manager is the simplest way to get the drive type (SSD or HDD) and model name in seconds.
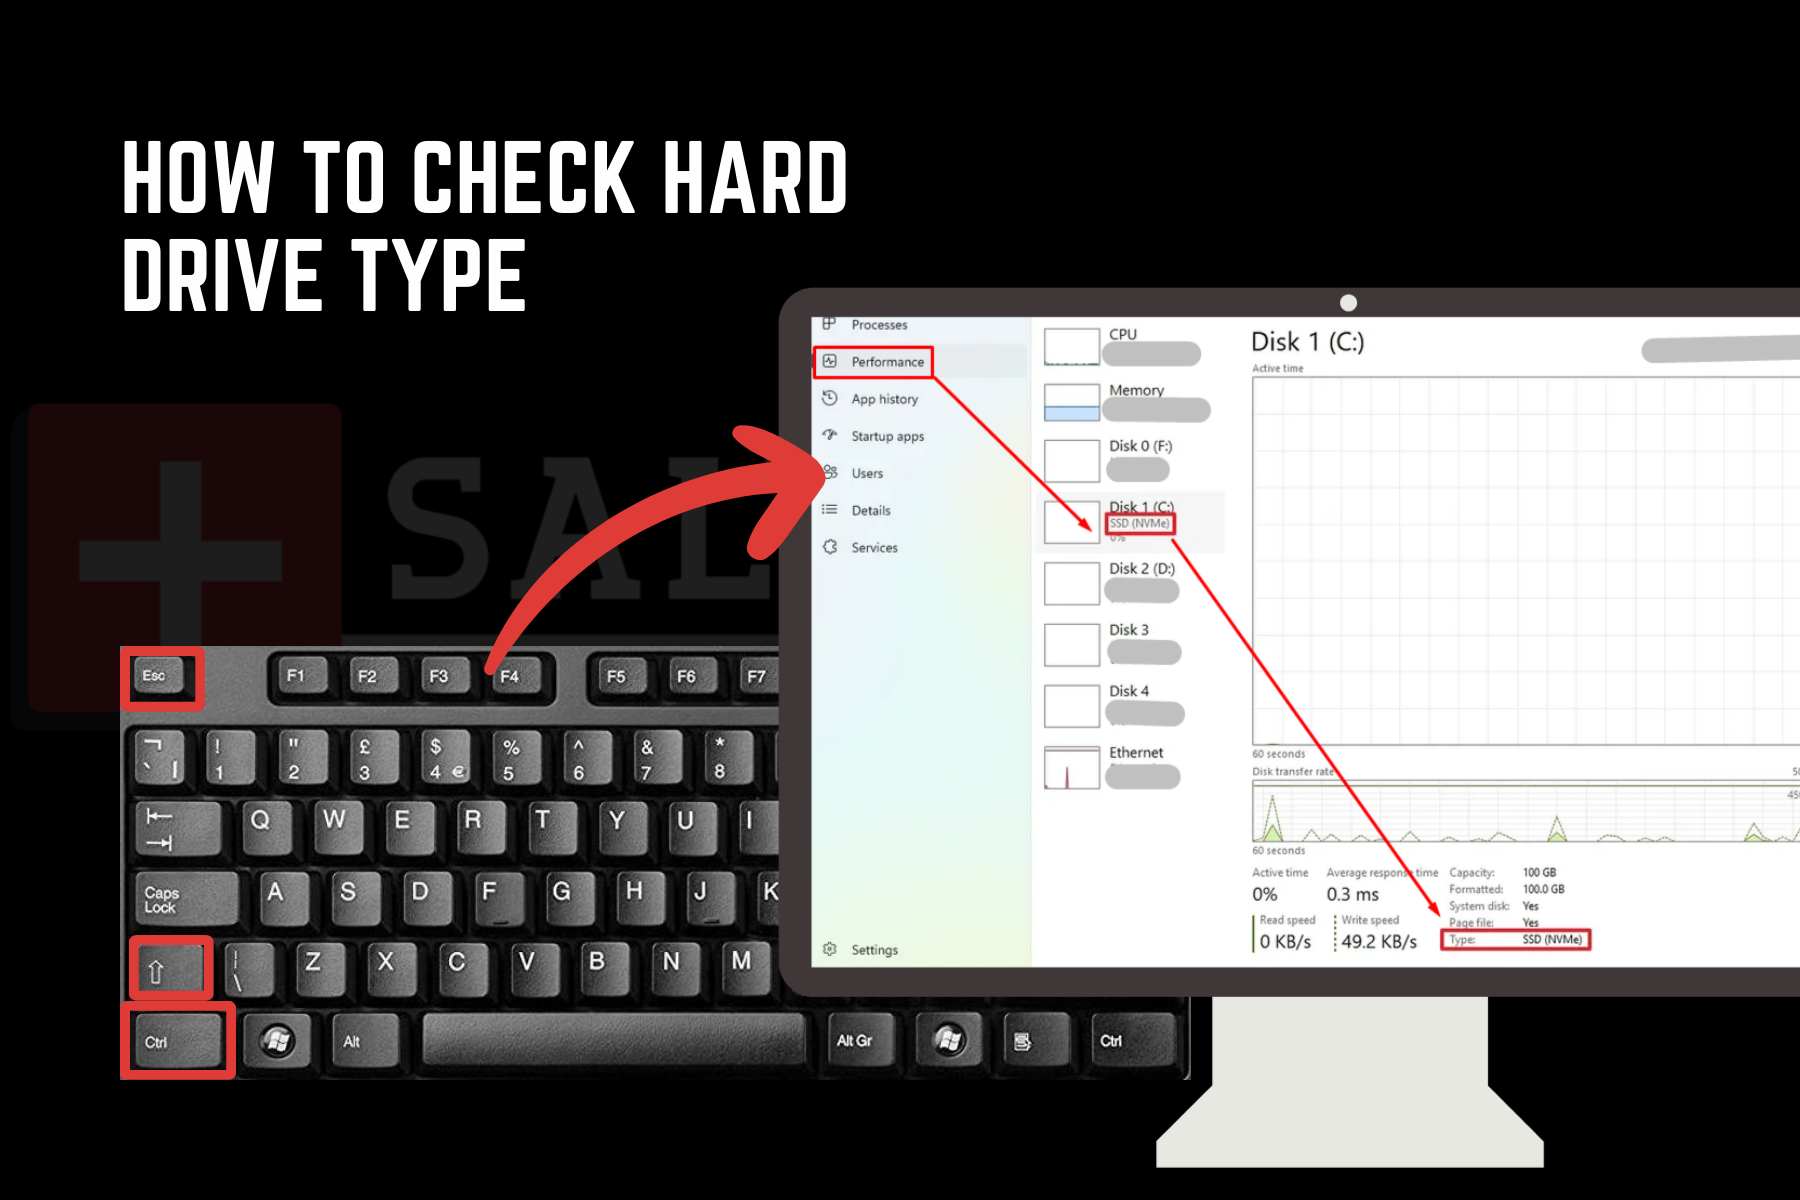
- Press Ctrl + Shift + Esc to open the Task Manager.
- Click the Performance tab (it looks like a small gauge on Windows 11).
- Select your Disk (e.g., Disk 0, Disk 1) from the menu on the left. The drive type (SSD or HDD) is clearly displayed right next to the drive model name at the top of the pane.
Use About This (macOS)
Best for: Mac users needing basic storage information.
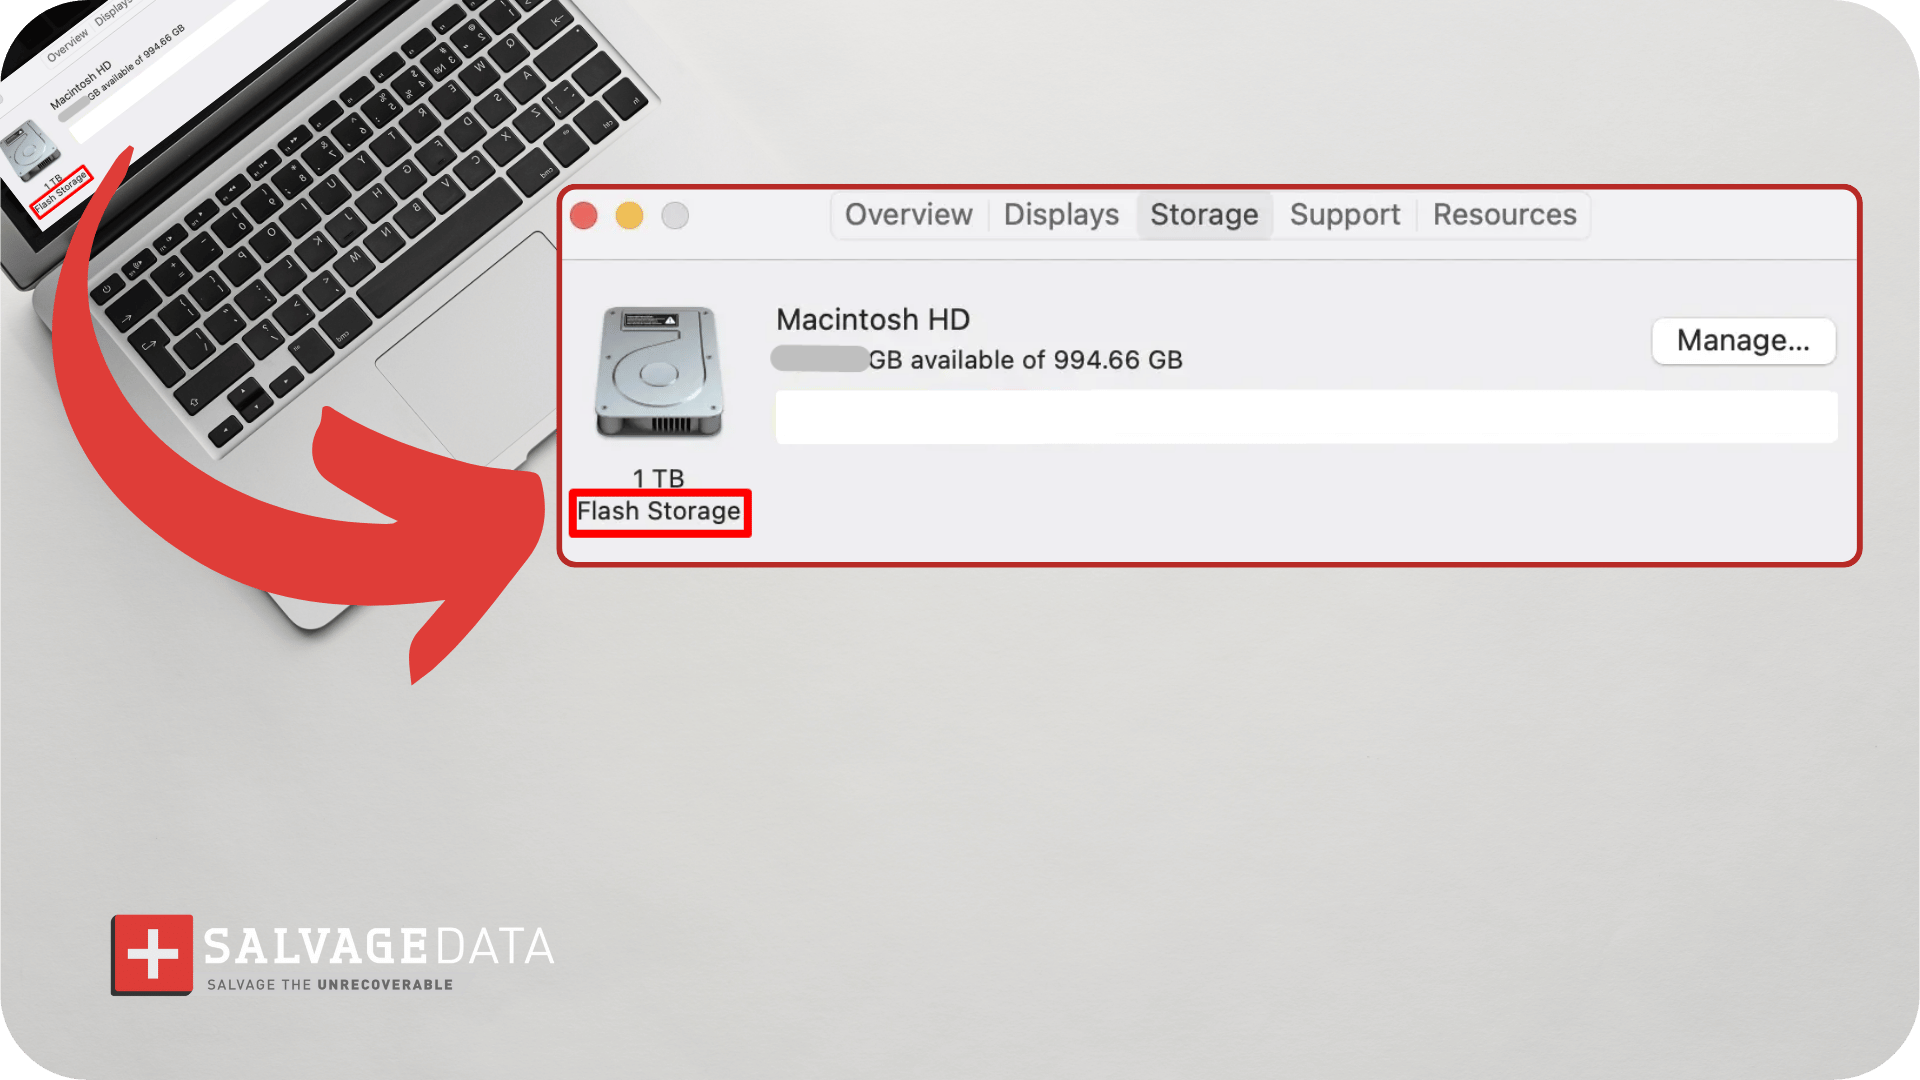
This is the standard and simplest way to identify your drive on any Apple computer.
1. Click the Apple menu in the top-left corner of your screen.
.png)
- Choose About This Mac.
- Click the Storage tab. Under the hard drive icon, the description typically indicates whether it's Flash Storage (an SSD) or provides a general description that helps identify the type.
Drive Optimizer / Defragmentation Tool (Windows)
Best for: Clear, explicit drive type confirmation
This utility is readily accessible and clearly lists the media type. To find what kind of hard drive you have with the disk defragmentation tool:
- Press the Windows key and R to open the Run window.
- Use the dfrgui command and press Enter.
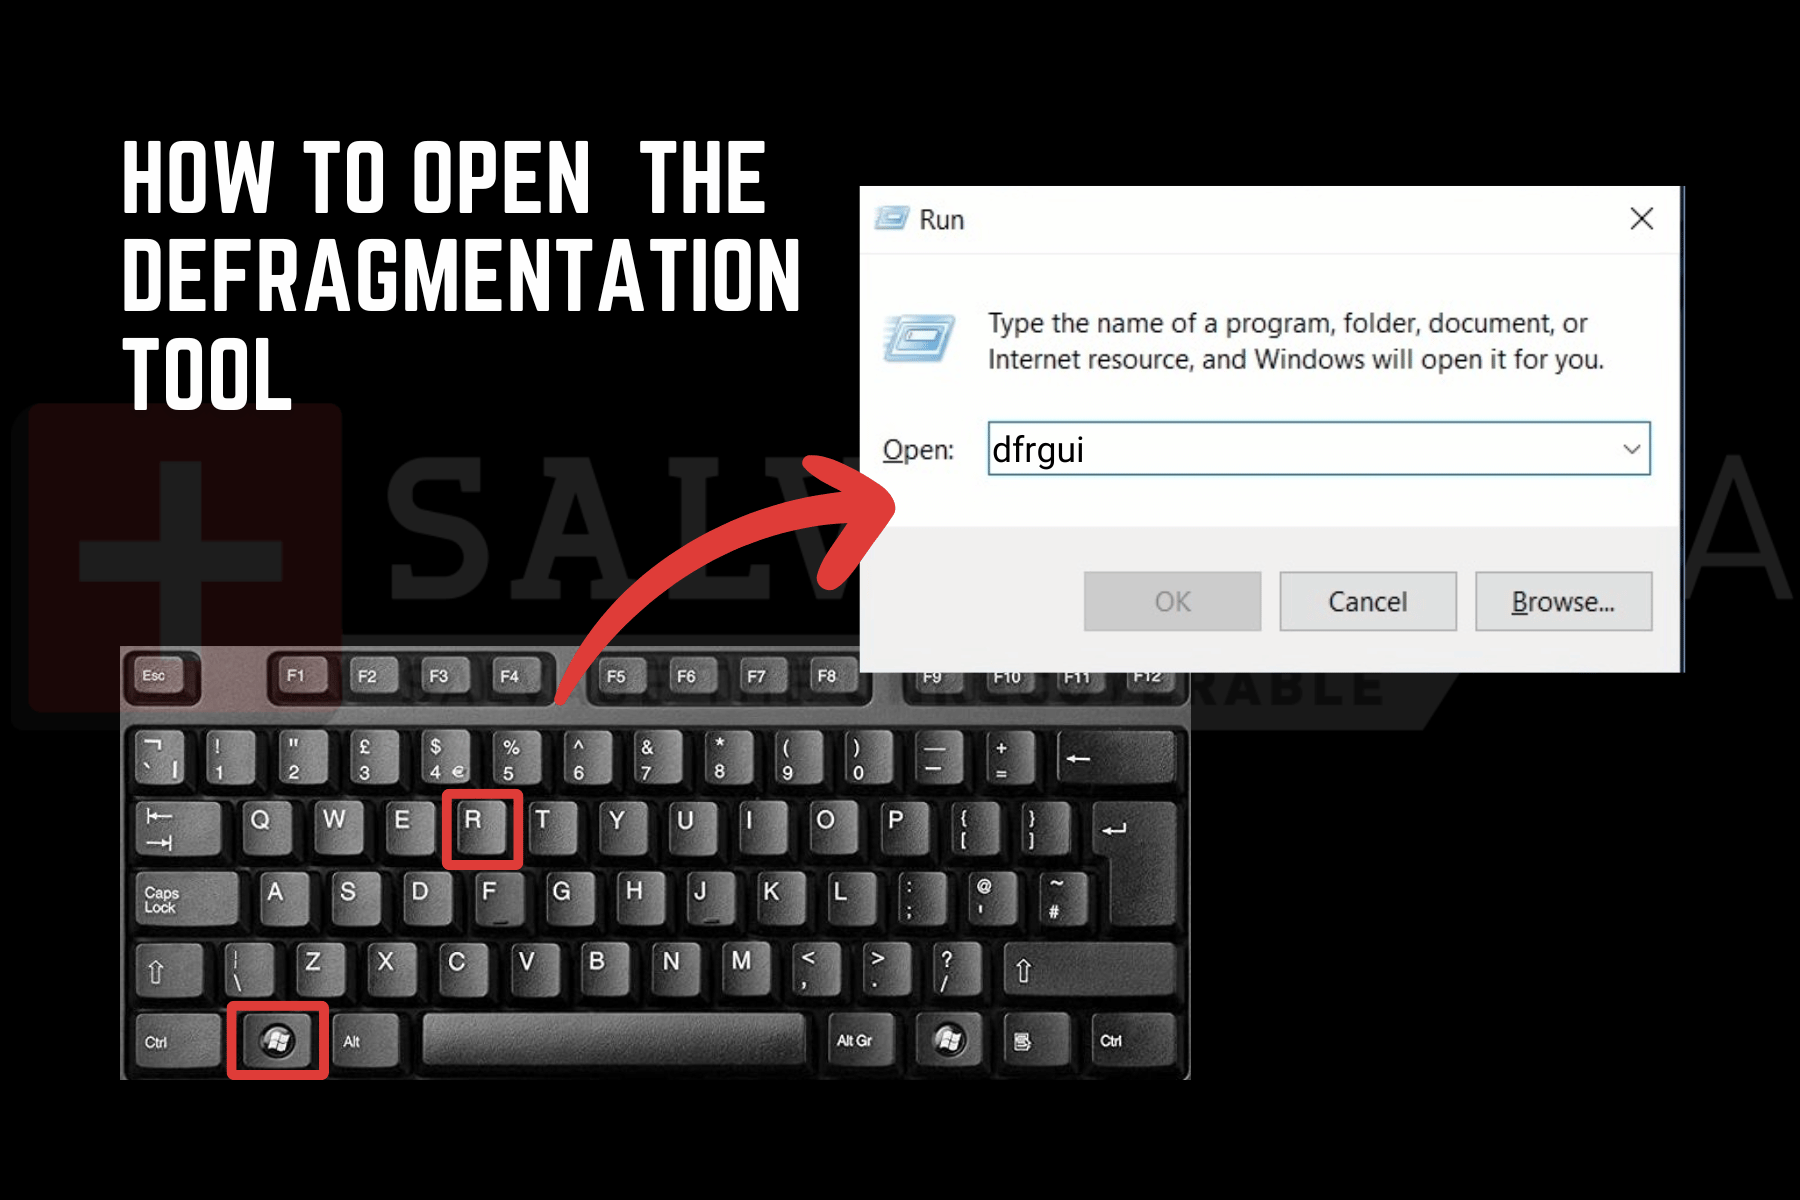
- The resulting Drive Optimizer window shows a list of your drives. The Media Type column explicitly states Solid State Drive or Hard Disk Drive.
.png)
Part II: Intermediate methods
These methods provide comprehensive information and are ideal when you need specific details for warranty claims, technical support, or compatibility checks.
- Best for: Users who need detailed technical specifications, including exact model numbers, firmware versions, and partition information.
- Time required: 2-5 minutes.
- Risk level: Low. Requires basic command-line knowledge but no system changes
Use PowerShell (Windows)
Best for: Command-line users who want detailed drive information quickly.
PowerShell provides a straightforward command to display all physical disks and their types.
- Press the Windows key and R to open the Run window.
- Write PowerShell and open it.
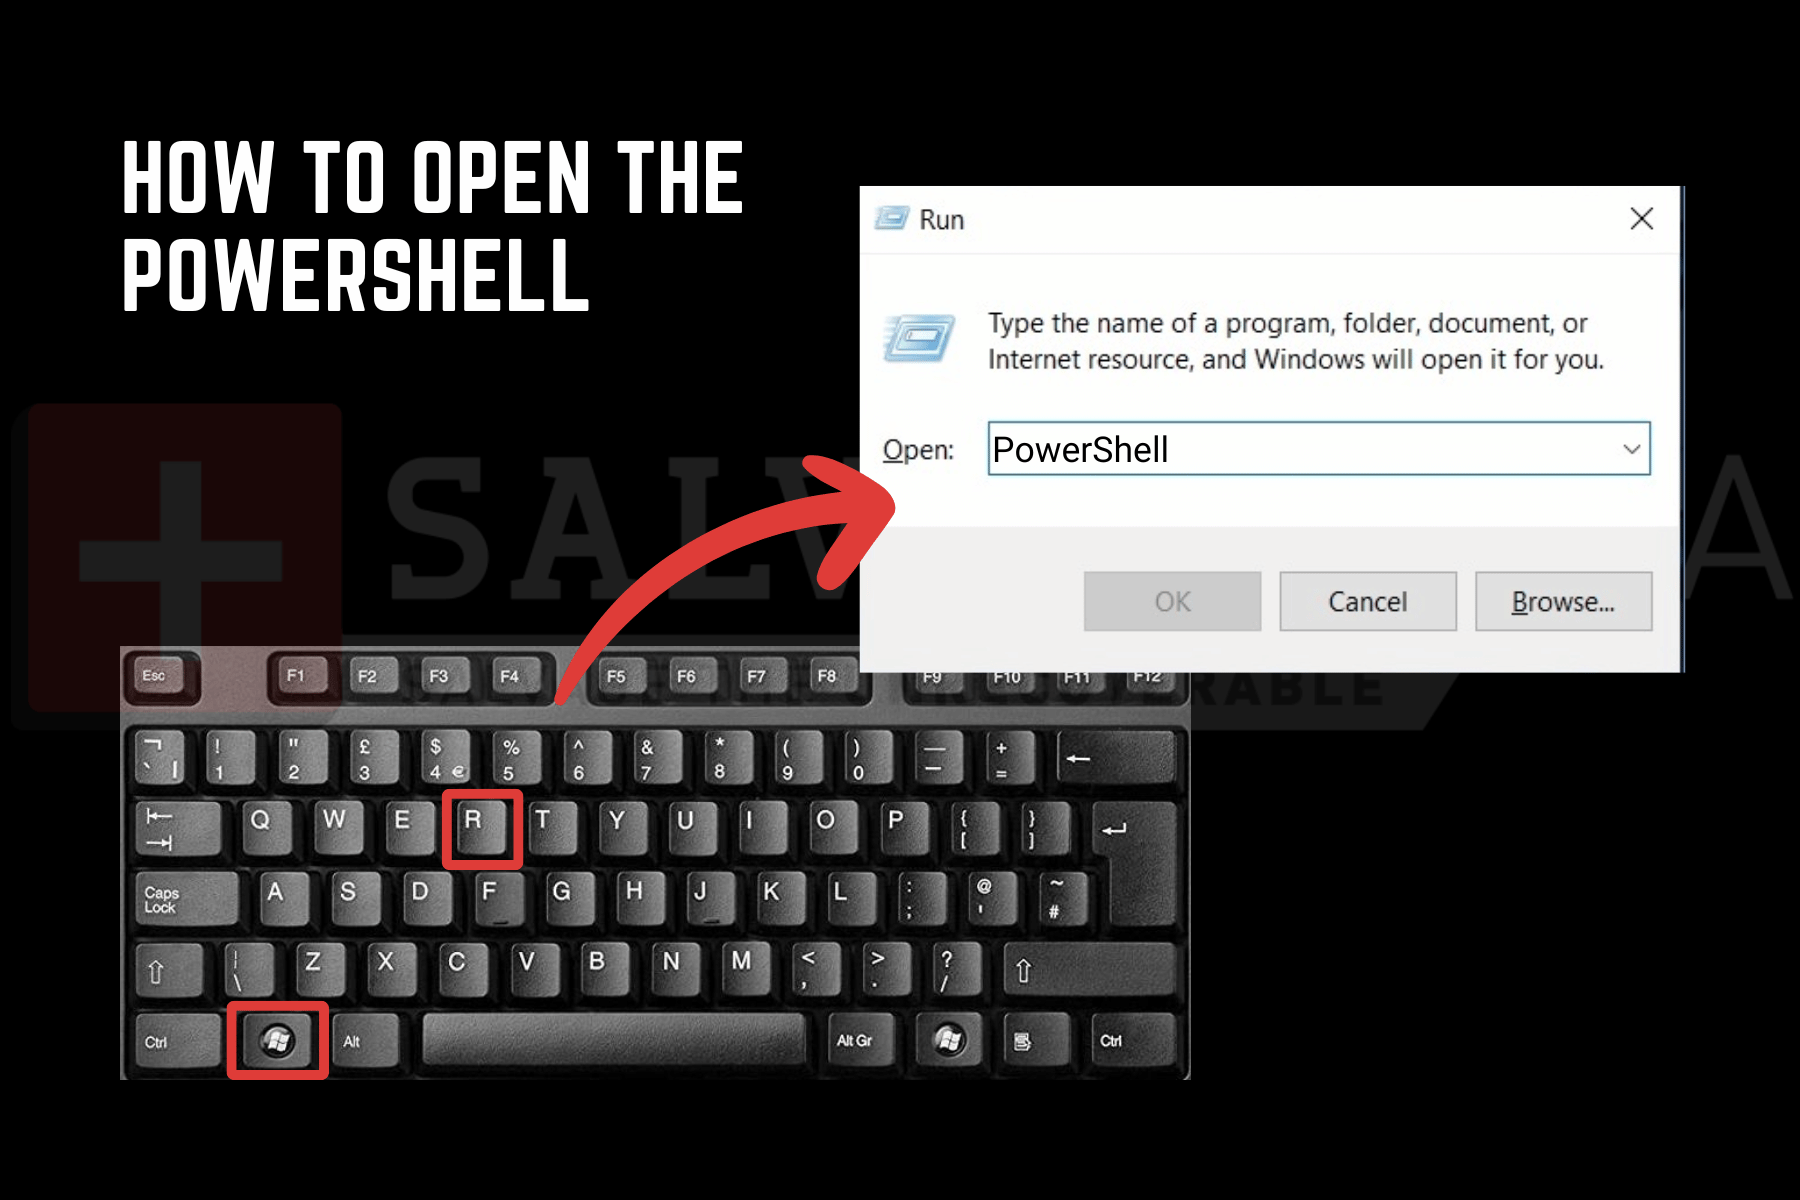
- Use the following command and press Enter: Get-PhysicalDisk | Format-Table -AutoSize
The output shows your hard drive details under the Media Type column, along with size, health status, and operational status.

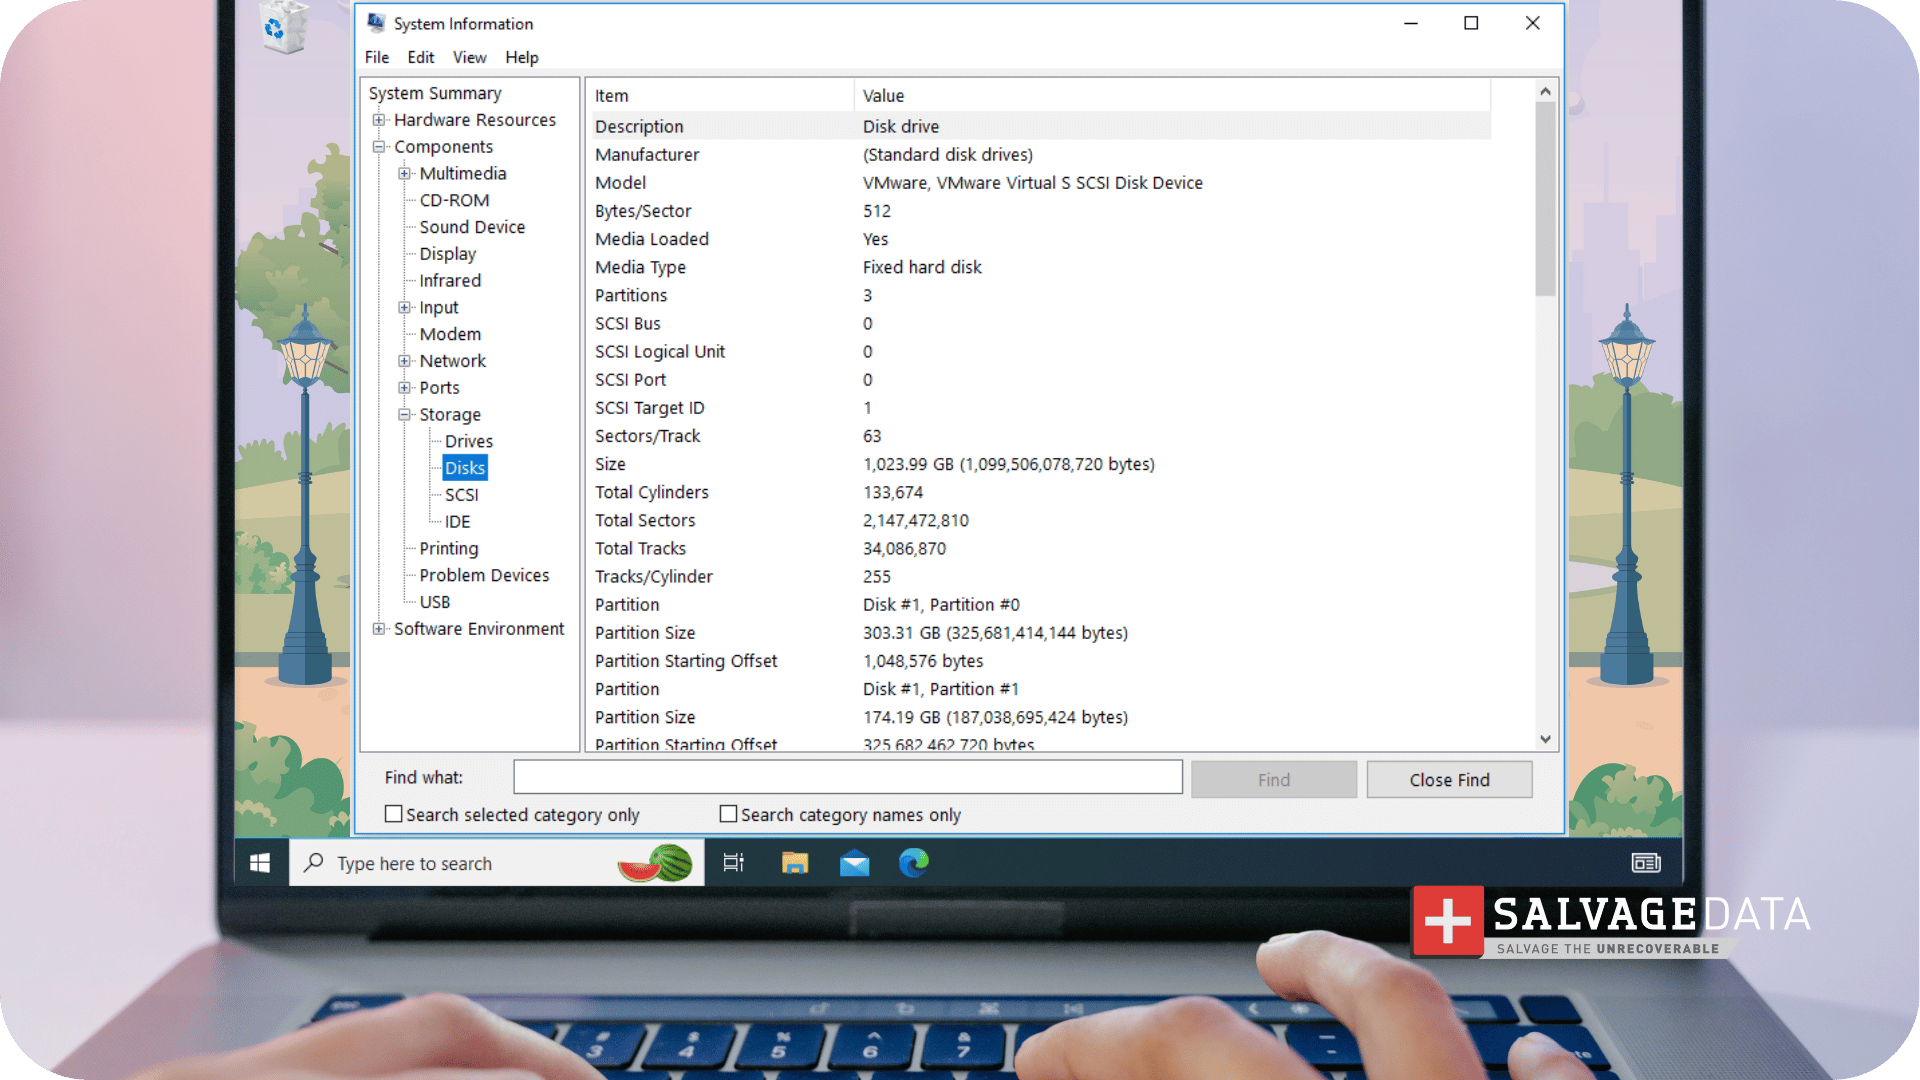
Windows’ System Information Tool
Best for: Comprehensive hardware details, including manufacturer, partitions, and drive geometry.
The built-in System Information utility allows Windows users to view detailed information about their computer hardware. You can check your PC's disks, model characteristics, hard drive manufacturer, partitions, and more.
- Type System Information in the Windows Search box (or use the Run command msinfo32).
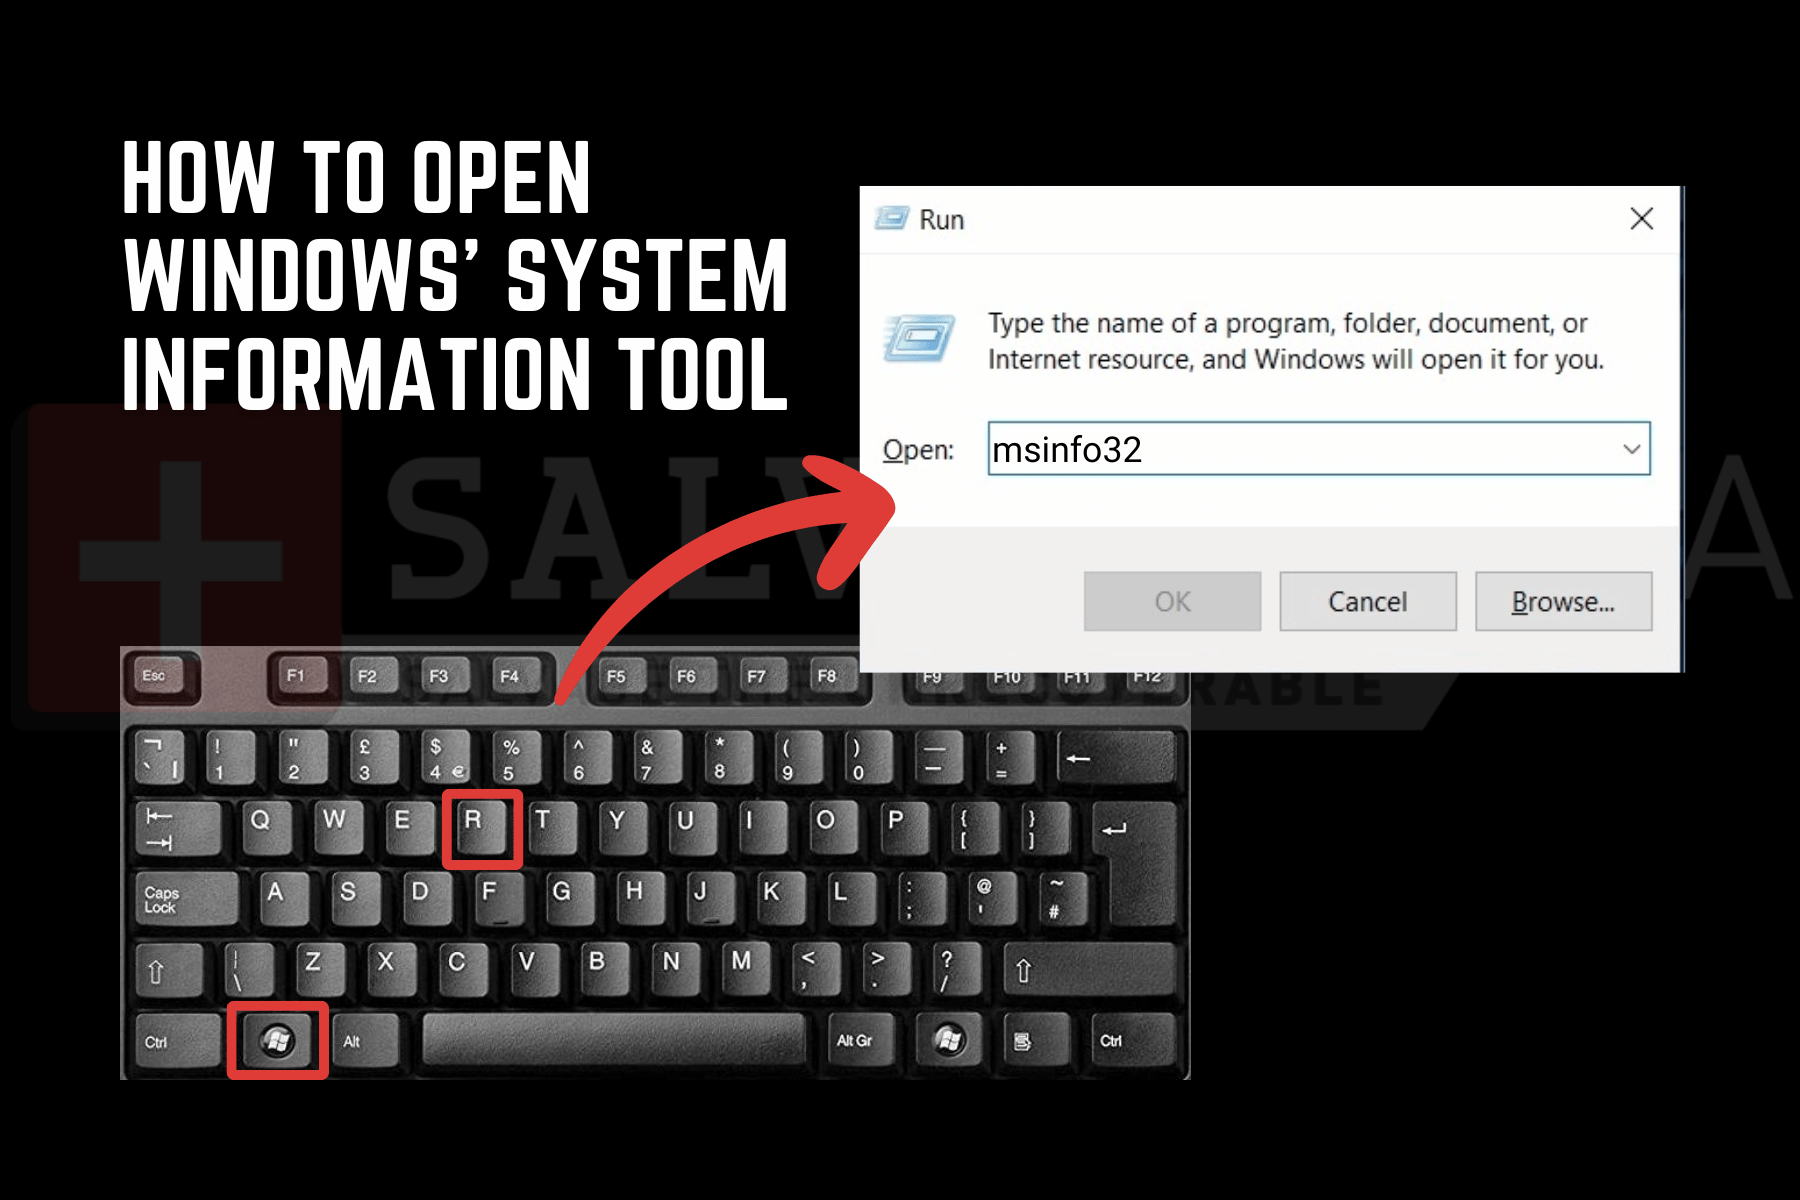
- On the left side of the window, expand Components > Storage > Disks or Drives.
- The right side of the window displays detailed information, including Model, Capacity, Partitions, and, sometimes, Media Type.
System Report (macOS)
Best for: Complete technical specifications on Mac computers.
For the most technical specifications on a Mac, use the System Report.
1. Click the Apple menu, then choose About This Mac.
2. Click System Report, or More Info, depending on the macOS version.
3. In the System Report window, navigate to Hardware > Storage (or Serial-ATA for older drives) to find the drive's exact model number, capacity, and bus type.
Third-party monitoring tools
Best for: Ongoing drive health monitoring and detailed S.M.A.R.T. data.
Tools like CrystalDiskInfo (Windows) or DriveDx (macOS) provide comprehensive drive information and health monitoring in a user-friendly interface
Why use these tools:
- Real-time temperature monitoring
- S.M.A.R.T. status and error predictions
- Read/write statistics
- Power-on hours and drive lifespan estimates
How to use:
- Download and install CrystalDiskInfo from the official website (crystalmark.info) or DriveDx from the Mac App Store.
- Run the application. No configuration needed.
- The drive's status window immediately displays Model, Firmware Version, Capacity, Interface type (e.g., SATA/NVMe), and health status with color-coded warnings.
Note: These tools are free (with optional premium versions) and safe to use, but always download from official sources.
Part III: Advanced and risky methods
These methods should only be performed by experienced users or when necessary for specific technical situations.
- Best for: Troubleshooting hardware detection issues, verifying BIOS settings, or when software methods fail.
- Time required: 5-15 minutes.
- Risk level: Medium to High. Incorrect BIOS changes can affect system stability, and physical handling risks can cause damage
Using BIOS/UEFI Setup
Best for: Checking if drives are properly detected before the operating system loads.
The BIOS (Basic Input/Output System) or UEFI (Unified Extensible Firmware Interface) can display drive information before your operating system boots. This method is useful when drives aren't appearing in Windows or macOS.
- Restart your computer.
- During the initial boot screen (usually showing the manufacturer logo), press one of these keys repeatedly:
- F2 (most common for laptops)
- Del or Delete (common for desktops)
- F1 (some Lenovo/IBM systems)
- F10 (some HP systems)
- Esc (some systems)
Tip: The correct key is usually displayed briefly during boot (e.g., "Press F2 for Setup").
- Once in BIOS/UEFI, navigate to sections labeled:
- Storage Configuration
- Boot or Boot Menu
- Advanced > SATA Configuration
- System Information
- Look for information including:
- Drive model number and serial number
- Capacity and geometry (cylinders, heads, sectors)
- Interface type (SATA, NVMe)
- Detection mode (IDE, AHCI, RAID)
Drive values may be inaccurate if your BIOS is configured for manual rather than automatic detection.
Getting disk type info directly from the drive
Best for: Verifying the exact model and specifications when the drive isn't detected by software
You can read information printed directly on the drive's label, which includes the definitive model number, serial number, and manufacturing specifications.
Learn how to remove it from the laptop or computer with our guide.
Warning: Because of the hard drive’s fragile design, this type of storage media is highly susceptible to physical damage and therefore requires special care in handling. If you are unfamiliar or uncomfortable with the process, we recommend resorting to less risky methods.
Quick summary
You can see your hard drive's detailed information on Windows or macOS in just a few seconds using the methods in Parts I and II. These details are important to know if you need to install a new application or software that has minimum requirements, so you can make sure your device supports it.
If you encounter any issues or suspect drive failure, contact our SSD or hard drive data recovery team.